Supernote Calendar
Discover how to use Supernote's calendar feature to increase efficiency, simplify scheduling, and stay organized.
Table of Contents
Designed with productivity in mind, Supernote offers the calendar feature to help you keep track of your important deadlines, appointments and projects. Use it to manage your schedule and remind you of significant dates, tasks and goals in your work/study and life.
Add Google Calendar
- Tap Calendar in the sidebar menu.
- In the top left corner, tap the three-line menu icon.
- Tap
 to the right of Google to start the authorization process.
 - Scan the QR code or enter in your browser the URL displayed on the page.
- Enter the random code into the input box.
- Tap Authorize.
By default, the Auto Sync option is toggled on automatically. If it's toggled off, you will need to tap the sync botton (the one next to the plus button) in the top right corner to sync your Google Calendar manually. Auto Sync will only be triggered when you create, edit or delete events on Supernote. Changes made to the events on other external devices, such as your computer, will not trigger the Auto Sync feature, even when it's enabled on your Supernote. This is because the calendar and server connection might not be consistently available. For instance, when your Supernote is in sleep mode or isn't connected to Wi-Fi, the synchronization process is not activated. Therefore, to sync changes you make on other external devices to Supernote, you will need to manually tap the sync button in the top right corner of the screen.
Microsoft Outlook Calendar is also supported on Supernote. Follow the same steps above to add your Microsoft Outlook Calendar to Supernote.
Navigate your calendar
- Tap the “Month/Year” displayed in the middle of the top function bar.
- In the popup window, tap the up and down arrows to go to your desired year and month.
- You can tap the left and right arrows next to the “Month/Year” to switch between months/weeks/days depending on the calendar view you are in. Alternatively, you can simply swipe left or right to change the view to the next or previous month/week/day.
- Tap the Today button to return the calendar view to the current date.
Change your calendar view
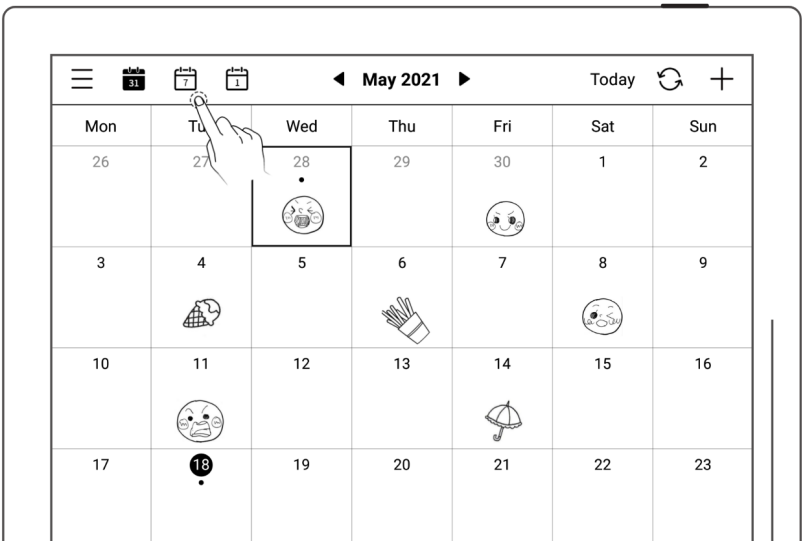
When you first access Calendar from the sidebar menu, the default calendar view you see is the monthly view.
- Tap Calendar in the sidebar menu.
- In the top left corner of the screen, tap
 or
or  to switch to the weekly or daily view.
Note: When you are in the monthly or weekly view, you can jot down a handwritten note or draw a sketch to a day in your calendar.

Set the start of the week
Not everyone shares the same schedule and works from Monday through Friday. Users, who have a nonstandard workweek, will find this feature a delight to make use of.
- Tap Calendar in the sidebar menu.
- In the top left corner, tap the three-line menu
 .
. - Tap anywhere in the rectangle under Start of the week .
- Tap the circle to the right of the day you want to select as the start of your week.
- Tap anywhere outside the menu to close it.
Note: To set a new day as the start of the week, you need to delete handwriting (if any) on all pages in the calendar.
Create calendar events
- If the calendar is in the weekly or monthly view,
- Select the event date.
- In the top right corner of the screen, tap the plus button
 .
. - Add a title and any event details.
- Set a time for the event. You can make it an all-day event or set a specific start time and end time for it.
- Tap OK.
- If the calendar is in the daily view,
- Select the event date.
- Tap a time slot. You can change the start time and end time as needed.
- Add a title and any event details.
- Tap OK.
Edit calendar events
- If the calendar is in the weekly or monthly view,
- Select the date you've created events for.
- Tap the date square to open a popup window and view all the events at a glance. (This is especially helpful when there are more than 3 events.) Alternatively, you can simply view the events in the bottom right corner.
- Tap the edit icon to the right of the event you want to edit.
- Make changes to the event.
- Tap OK.
- If the calendar is in the daily view,
- Select the date you've created events for.
- Tap the date in the top left corner to open a popup window. This helps display the events in a more organized way. Alternatively, you can simply view the events as is, with no action required.
- Tap the edit icon to the right of the event you want to edit.
- If you've not tapped the dated as mentioned in Step 2, you can simply tap the event you want to edit and repeat Step 3.
- Make changes to the event.
- Tap OK.
Link notes to the calendar
When the calendar is in the weekly or monthly view, you have the ability to link notes to the calendar.
- Tap New Note in the bottom left corner.
- After the note is created, you can tap View Notes to open a popup window.
- Tap Open to the right of the note you want to view.
- Lasso handwriting in the note and it will be recognized as the title for a new calendar event.
Note: When viewed in the calendar, notes are now displayed based on their creation date, as opposed to the last modification date.